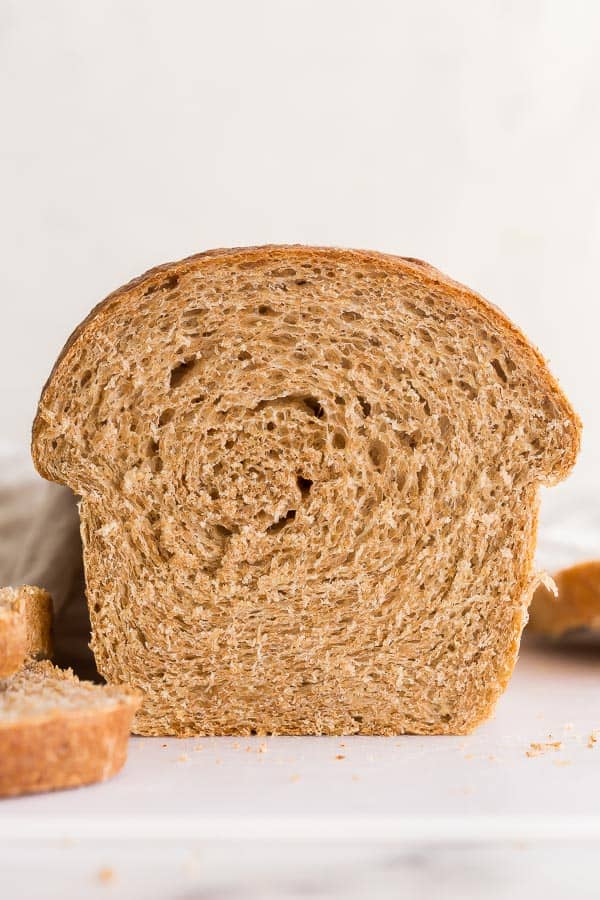
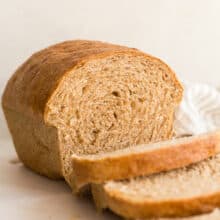
This Whole Wheat Bread is light and fluffy, and easier to make than you might think! A hearty and healthy loaf for sandwiches, toast and more.
See the step by step recipe video in the recipe card below.

Table of Contents
This post is generously sponsored by Canola Eat Well and I was compensated for my time in creating this recipe. Thank you for supporting those that make The Recipe Rebel possible!
While I spend a lot of time here sharing easy dinner ideas, homemade bread one of those things that I just love to make.
It is a somewhat slow process, but watching the progress in each step is so rewarding. (My Mom’s Homemade Buns and these Cinnamon Buns are two of our other favorites to bake!)
This Whole Wheat Bread is made almost entirely with whole wheat flour (and you can choose to use 100% whole wheat flour in this recipe if you choose — see my notes below) and it is still light and fluffy.

Canola oil is our go-to in the kitchen.
I know how much good stuff is in it, and it’s easy just to grab the bottle and drizzle a little in a pan, or into a measuring cup. I have found that butter just doesn’t compare to canola oil when adding moisture to baking — canola oil baked goods, cakes and muffins always turn out way better!
Another reason I choose canola oil over melted butter is because it is a healthy fat that is rich in Omega-3 — in fact, it has the most planted based Omega-3 polyunsaturated fat of common culinary oils!
If that wasn’t enough, it also saves me a step since I don’t have to use the microwave, which means we are that much closer to enjoying that smell of fresh bread wafting from our ovens 😉
It’s perfect for sandwiches, your morning toast and so many other things!
What are the ingredients in Whole Wheat Bread?
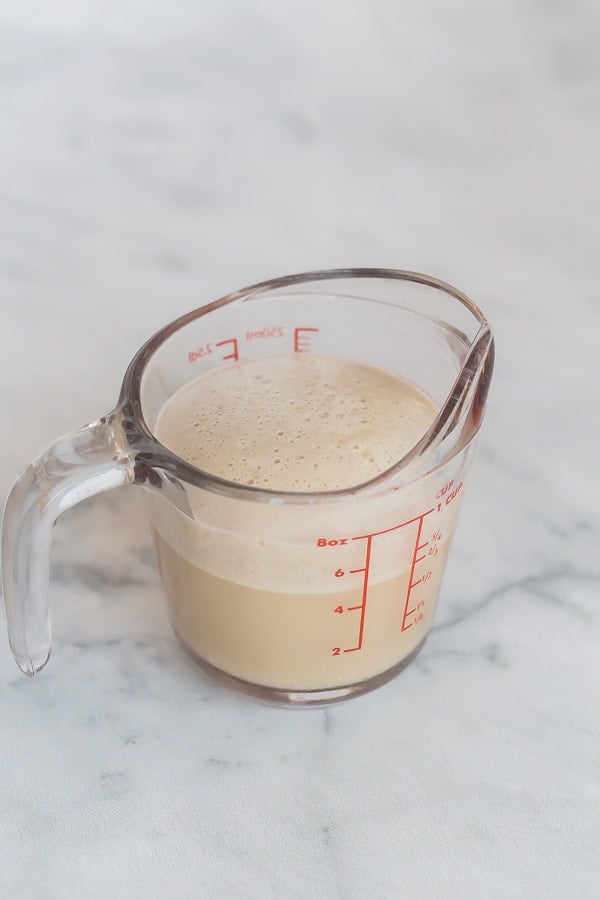
- Warm water: 110-115 degrees F is best for activating yeast, but I just run the warm water tap until it is noticeably warm, never hot. A touch above lukewarm is great!
- Honey: a little sweetness helps to activate our yeast and to balance out the nuttiness of the whole wheat flour — you can swap for another sugar if you prefer, and increase up to ¼ cup per loaf of bread
- Instant Yeast: I always use quick rising yeast in my yeast breads, but you can use active dry yeast in this recipe without changing a thing other than rise time — active dry yeast may require additional time to rise.
- Milk: milk adds flavor, sweetness, and softness to bread. You can swap the milk with water if you wish to make this bread vegan — it will work just fine!
- Canola Oil: along with all of the reasons for adding a healthy fat to our diets, canola oil helps the bread to bake up soft, moist and fluffy.
- Salt: salt is flavor! End of story 🙂 (I mean, it also helps to strengthen your bread and control the rate at which your dough rises)
- All purpose flour: I tested this recipe many (many, many) times, and I found that my family enjoyed it more with some all purpose flour added in — a little ensures that our loaf is light and fluffy, and is a little less nutty tasting (although I promise it has all the flavor of whole wheat bread!)
- Whole Wheat Flour: it is richer in fibre, folate, iron, protein, and other vitamins and minerals than all purpose flour, with a rich and nutty flavor.
*I choose not to use any bread flour in my yeast bread recipes, because I want the recipe to be accessible to everyone without having to have 10 different bags of flour 😉 I haven’t tested this recipe with bread flour, so I can’t say what kind of results you would have.

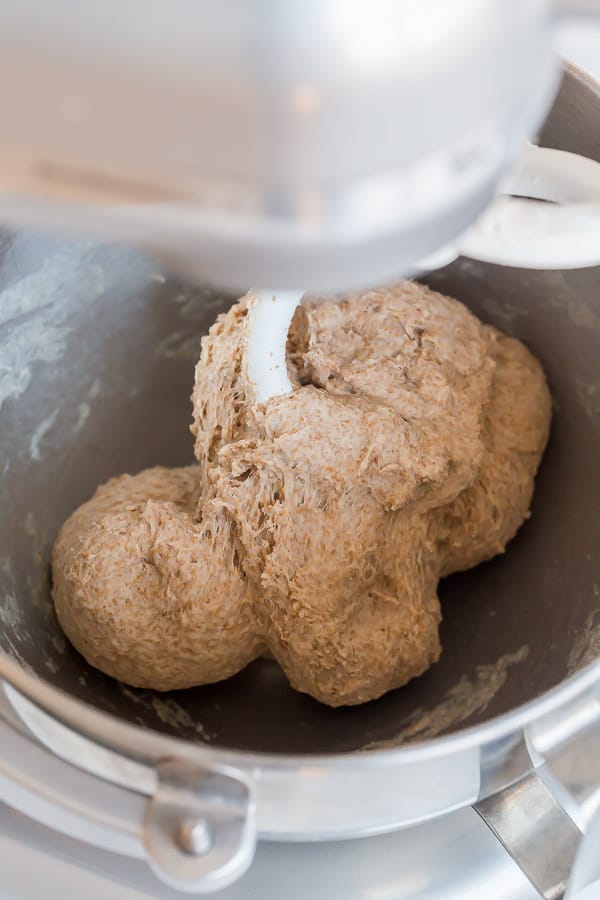
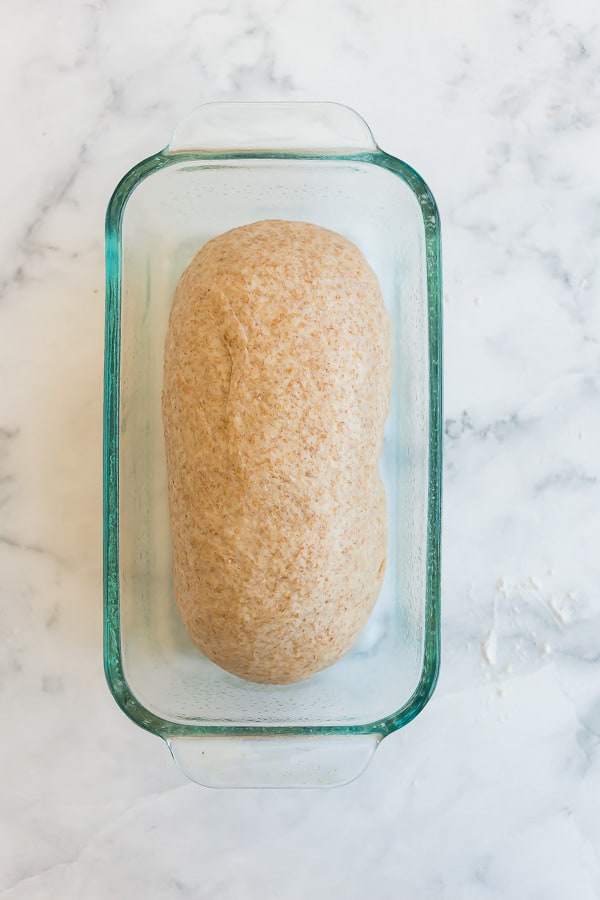
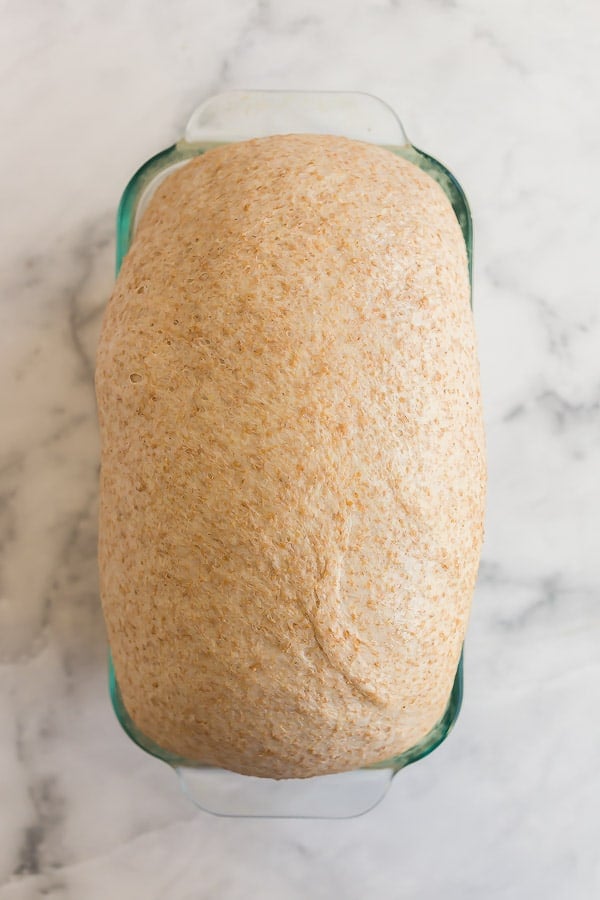
Bubbly yeast! Dough pulls away from sides of bowl Loaf before second rise Loaf after second rise
Can I use 100% whole wheat flour?
Definitely!
I created this recipe to take advantage of all the benefits of whole wheat flour with the light and fluffy texture of white bread.
Using 100% whole wheat flour is absolutely fine, but it will be slightly denser and have a richer whole grain flavor — which you may love!
How long does Whole Wheat Bread last?
While it’s true that homemade bread won’t last as long out on the counter as most store-bought breads (thanks to a simple ingredient list!), this bread will stay light and fluffy for a few days — and by that time it is usually gone around here!
You can leave it at room temperature for a longer period, but it may begin to dry out. This is fine if you are using the bread for toast, French toast, etc.

If you want to store your bread for longer than a few days, simply slice (use a serrated knife or electric knife to avoid flattening it), and store in an old bread bag in the freezer. This way, you can grab just one or two slices as you need them!
Whole Wheat Bread will stay fresh in the freezer for about 6 months.
How to store homemade bread:
After baking your bread, remove from the pan as soon as you can handle it and place on a wire baking rack to cool completely — this will keep it from getting soggy.
Allowing the bread to cool can take some time, often several hours, so don’t rush it. You want it to cool completely before slicing so that it stays fresh!
I like to place my cooled loaf in an old bread bag or another plastic bag, and twist to seal tightly.

More baking with yeast!
- This Easy Pizza Dough is a family favorite!
- Homemade Breadsticks are perfect for dunking.
- Homemade Hot Dog Buns will take your next barbecue up a notch!
- This Monkey Bread is a decadent treat for any day of the week!

Whole Wheat Bread
written by Ashley Fehr
Ingredients
To Proof Yeast
- ½ cup warm water (not hot)
- 3 tablespoons liquid honey (not creamed)
- 2 ¼ teaspoons Instant yeast (or sub active dry)
Whole Wheat Bread
- ¾ cup warm milk (microwave for 30-40 seconds)
- 2 tablespoons canola oil
- 1 ½ teaspoons salt
- ¾ cup all purpose flour
- 2-3 cups whole wheat flour
Instructions
Proof the yeast
- In a liquid measuring cup or small bowl, whisk together warm water, honey and yeast.
- Let sit for 5-10 minutes until bubbly.
- If it does not become bubbly, your yeast is dead and the loaf will not rise. Start again with new yeast.
Whole Wheat Bread
- In the bowl of a stand mixer (you can also mix this dough by hand, it will just require a little more muscle!), stir together warm milk, oil and salt.
- Whisk in frothy yeast mixture and all purpose flour.
- Place the bowl in the stand mixer fitted with a dough hook and add 1 cup of whole wheat flour.
- Turn the mixer on low and knead until combined, scraping the flour off the sides of the bowl as necessary.
- Gradually add just enough flour to form a tacky dough — a few tablespoons at a time. Allow the flour to be worked into the dough completely before adding more.
- When the dough pulls away from the sides of the mixer and is tacky but not sticky, it is ready. When you touch it, the dough should not come off onto your fingers, but it will feel tacky.
- Drizzle canola oil around the edges of the bowl and over the dough, twisting and turning until the ball of dough is lightly coated in oil.
- Cover with plastic wrap or a clean kitchen towel and place in a warm, draft-free place to rise until doubled, about 1 and a half hours.
- Punch dough down and dust lightly with flour (not too much! Just enough so that you can work with it). Roll out into an 8" wide strip, pressing it out with your hands or use a rolling pin. It's important to pop any large bubbles so you do not get air holes in your baked loaf.
- Roll the dough up tightly and pinch the seam to seal. Place dough seam-side down in a lightly greased 4.5 x 8.5" loaf pan (8" or 9" will work fine) and cover with a lightly greased piece of plastic wrap — this will ensure it does not stick.
- Let rise in a warm, draft-free place for 45 minutes or until doubled.
- Bake at 350 degrees F for 30 minutes or until light golden brown — it should sound hollow when tapped. For a golden brown loaf, brush the top lightly with canola oil in the last 10 minutes of baking.
- Remove from the oven and let bread cool 5-10 minutes in loaf pan before removing it and placing it on a wire rack — you cannot leave it in the pan or it will become soggy!
- Let cool completely (3-4 hours) before slicing.
Nutrition Information
Want to save this recipe?
Create an account easily save your favorite content, so you never forget a recipe again.
Tried this recipe?
Tag @thereciperebel or hashtag #thereciperebel — I love to see what you’re making!
Tag @thereciperebel


Rachel says
I’ve made this about 6 times and each time it gets better. I’m just wondering how to go about making a full loaf instead of just half a loaf. Any help???
The Recipe Rebel says
Hi Rachel, do you mean like a full loaf you would find at the grocery store? This is a full loaf for this type of bread. Maybe try doubling the recipe and using a longer pan?
Sidney says
I’ve made this recipe three times now and it has earned its way into my bread rotation! It hasn’t failed me. I don’t have honey on hand, so I subbed it for agave. It works great! This loaf is perfect for sandwiches and tasty toast.
The Recipe Rebel says
Hi Sidney! So glad you enjoyed the recipe! Thank you for this kind review!
Trey says
How do you create the nutrition information for your homemade goods?
The Recipe Rebel says
Hi Trey, it’s build into the recipe card. I don’t actually do the calculation. Hope this helps!
Kiersten Gascon says
Hi there,
I’m anxious to see if mine turns out. It’s on the 2nd rise now, but I didn’t see in the directions when to add the all purpose flour, so I thought it was just for dusting the dough. Keeping my fingers crossed.
The Recipe Rebel says
Hi Kiersten, it is in Step 2 when you add the yeast. Enjoy!
Vicki says
I made this today and it is wonderful. No issues with bread falling. I’m in the South.
The Recipe Rebel says
Hi Vicki! So glad you enjoyed the recipe! Thank you for the review!
Sara says
I made this today, and though it rose some, it didn’t get that beautiful dome on top like I expected. It made a flat-topped loaf, however it was still 5 inches high and tastes great. I’m a pretty new bread maker living in the Midwest. So I’ll attribute this to my own inexperience, and try it again sometime. Thank you for the recipe!
The Recipe Rebel says
Hi Sara! So glad you enjoyed the recipe! Thank you for this kind review!
Bill M says
I haven’t tried it yet, but as a veteran bread maker it looks fine.
I often don’t have dairy milk on hand but have had satisfactory results using plant based (e.g. soya) milk in bread recipes, or powdered milk in with the dry ingredients and maybe a few extra tablespoons of water.
Puzzled by the folks who have had it fall. It is possible to over proof bread in the rising stages. I would say don’t try to get it extra fluffy. Scant doubling in size might help.
The Recipe Rebel says
Thanks for the feedback Bill!
Julie says
Tried this in my bread maker tonight with success! I have a Cuisinart compact. Added wet then dry and yeast on top like normal. Wheat setting 1.5 lb and the darkest crust. Turned out great. Next time I’ll try the medium or light crust. It’s so light and fluffy!!
Pati says
How much of the flour did you use for the bread machine? I have a Zo V+ and was looking forward to trying this recipe. TIA
The Recipe Rebel says
Hi Pati! I’m pretty sure she used the measurements in the recipe here.
The Recipe Rebel says
Hi Julie! So glad you enjoyed the recipe! Thank you for this review and feedback on the bread maker!
Amber says
I am not a novice baker and I also had a weird loaf. Won’t be making again.
Was fun trying a new recipe though.
Funny, I read the negative reviews and just assumed it was beginner bread baker issues and then it happened to me 😂
The Recipe Rebel says
I’m sorry to hear you had trouble with the recipe. It’s hard to know what went wrong without being in the kitchen with you.
Joan says
I have tried this recipe twice and both times the bread has fallen after the second rise and makes small dense loaves. I made sure to use new yeast the second time baking it and to push out any air bubbles. I am at kind of a high altitude and wondered if that could make a difference. I have it extra rose time for first and second rise too.
The Recipe Rebel says
I’m not sure why you are having that issue Joan but high altitude baking does require some adjustments.
Erin says
I just made this and it is currently cooling, but, I wish I could post a picture because it looks so beautiful!!
I substituted the canola oil for vegetable oil and I used 100% whole wheat flour, no all purpose flour, so I did end up increasing first rise time to 2 hours and 2nd rise time for over an hour so it fluffed up enough!
Excited to try it once it is completely cool! If it is tasty(which it looks like it will be delicious!) I will definitely be making this often! Thanks for the recipe! 🙂
The Recipe Rebel says
Hi Erin! So glad you enjoyed the recipe! Thank you for this kind review!
Azra khwaja says
Can I omit all purpose flour
Ashley Fehr says
This is answered in the post above
Joy says
First time making a sandwich loaf (I usually stick with quick breads.) I was pretty distracted as I had young children helping in the kitchen and despite extra hands poking the dough and me forgetting to oil the pan, it turned out great! I used 100% White Wheat Flour, active dry yeast, and the vegetable oil I had on hand. We all loved it! Will try to start making it regularly. Thanks for a great, simple recipe that doesn’t include bread flour. ☺️
The Recipe Rebel says
Glad you enjoyed it, Joy!
Penny says
There is no kneading in this recipe? I am making it now and the bread is not rising the second time. And yes, my yeast was good.
The Recipe Rebel says
Hi Penny, the kneading process happened during steps 4, 5 & 6, but that’s all the kneading required for this dough. If it is not rising that could be ingredients or temperature. It would be hard to say without being in the kitchen with you.
Robin says
I agree with Penny. I’ve made this twice and once I remove the cover from rise #2 it falls to a dense loaf only about 2 inches high. I won’t be making this again
The Recipe Rebel says
Sorry to hear you had problems with this recipe, Robin. Also your comment is listed twice.
Kathy Reilly says
Just trying the recipe now. Just wondered why you proofed instant yeast. I used the ingredients but I put the liquid into the dry.
The Recipe Rebel says
Hi Kathy! It’s preference of mine. I want to make sure my yeast is actually going to activate.
Audrey says
Can you double recipe to get 2 loaves?
The Recipe Rebel says
Hi Audrey, I think to get two loaves you would just need to make the recipe twice. I think trying to double it would not work out during the rising process.
Ashley says
I doubled the recipe to make two loaves and had no trouble with the rise.
The Recipe Rebel says
Hi Ashley! So glad you enjoyed it! Thank you for this review!
Melissa says
Just tried this in my bread maker and it was PERFECT! I’ve tried a few different whole wheat bread recipes made for the bread maker and they never turn out fluffy like this one did. I just added all the wet ingredients then dry ingredients like my bread maker calls for and it turned out lovely!
One note is that you have to watch the dough a bit, I ended up starting with 3 cups of flour but had to add an extra 1/4 cup (or thereabouts) because the dough was too wet at first.
I also added chopped nuts in my bread maker’s “Add in” stage and it’s sooo good. Highly recommend in the bread maker!
The Recipe Rebel says
Hi Melissa! So glad it worked out for you in the bread maker! Thank you for this review!
Angie says
Hi there! Can wait to make this! But wondering also can this be made in a bread maker? Thank you for all ur awesome recipes!!
Ashley Fehr says
Hi Angie! I think it probably could but it’s probably been 10 years since I’ve used one so I can’t say exactly how
h_lane@yahoo.com says
Just making this recipe, and I believe you have yeast listed twice. Just watched the video to confirm and the yeast that is listed the second time should be salt.
Looking forward to popping this out of the oven in a couple of hours!
Ashley Fehr says
You’re right! I have since fixed it 🙂
Nancy says
looks good, can you make this in a breadmaker
Ashley Fehr says
Hi Nancy! Sorry, my experience with a bread maker is limited